the singularity of being and nothingness
JavaScript
ExtJS 4.2 Diversion: Custom Panel UIs
May 29th
I’ll be writing about this later on, but wanted to share some screenshots. I was playing around with the new Theming approach in ExtJS 4.2 tonight, and was trying to get some Twitter Bootstrap-inspired panel UIs going. Here are my initial results with a bit of theme-hackery:
The best part about these is that there was very little actual theming that needed to be done. I think the outcome is pretty sleek…I like the drop-shadow on the panels, the typography, and the more generous font-sizes and white space.
Anyway, just a tease, I suppose. I’ll put up some code later this week.
Peace.
Share this:
ExtJS 4.2 Walkthrough — Part 4: Steppin’ in Some CRUD
May 27th
We’ve finally arrived! After some setup, a bit of layout work, the creation of our first controller, a full version upgrade and even a bug fix, we’re ready to get into the heart of our application…specifically, interacting with data from our server. In order to do this, we’ll need to explore the concepts of Models, Stores and Proxies, as well as creating a new controller and even a fancy data grid with inline editing capability.
We’re in for a long haul in this installment, but it’s worth it. When we come out the other side, we’ll not only have real functionality working in our app, but we’ll also have covered some very important concepts that will let us ramp up our development of the rest of the application. Ready? Let’s do it.
Data ModelsNOTE: The code for this session can be found on GitHub.
As a developer, you’ve no doubt utilized data models on a regular basis. They are handy things, for not only do they let you describe objects via their properties and relationships, but they also semantically describe your application. In ExtJS, the Ext.data.Model fills this role, providing a really nice way to manage objects which can be grouped together in caches (a Store) and, More >
ExtJS 4.2 Walkthrough — Post-Upgrade Bug
May 27th
In the last installment, we took a few moments to upgrade our app from ExtJS 4.2.0 to ExtJS 4.2.1. As I pointed out, upgrading is not an insignificant decision, as you will have to test and verify that your app continues to work as expected.
Well, in preparing the next several sections, I came across a bug in 4.2.1 that harms a bit of the functionality I was wanting to implement. While these bugs are a natural (albeit frustrating) part of software evolution, ExtJS is fortunately extensible enough that we can easily create a custom patch (or override) that will allow our code to work as expected WITHOUT modifying the core framework. The benefit of this approach, of course, is that we future-proof our code against new versions. So then, when the new version comes out, we can remove our custom patch and see if the issue is resolved in the core. If it’s not, we can simply re-enable our patch, submit another bug ticket :), and continue on.
Tips for Dealing with BugsBefore we fix this bug, let me offer a couple suggestions to mentally dealing with bugs in ExtJS:
- Acceptance: The first step to healthily dealing with bugs in ExtJS is to More >
ExtJS 4.2 Walkthrough – Upgrade!
May 25th
As with all software, each version of ExtJS ships with the following:
- Bugs
- Known issues
- “Would-be-nice” features that didn’t make the prior release
Fortunately, the ExtJS team is constantly tweaking, fixing, and improving the framework. With each round of development, they’ll do various releases…some major like 4.2, others minor like the recent 4.2.1.
Should I Upgrade?With each new release, you have an important decision to make: will you continue using the version that you have (which is presumably working), or take a chance and upgrade?
What do I mean by “take a chance”?
With each new version, the full framework is re-released, and the upgrade you’ll make is total (unless you hack new changes into your existing version, which is definitely not advised…). While 99% of the changes won’t affect you whatsoever, there may be bug fixes, improvements, or just complete refactorings that will affect your app in some way. Obviously, the Sencha team does the best they can to mitigate these issues, but they happen nevertheless.
So if you are thinking about taking the plunge of upgrading, ask yourself a few questions first:
- Do I NEED to upgrade? Before you upgrade, view the release notes. These will outline all the bug fixes, enhancements, etc. that are included in the More >
ExtJS 4.2 Walkthrough – Documentation
May 22nd
This is a bit of an aside, but tonight I worked on migrating my current progress on this walkthrough app into JSDuck-style documentation. It turned out awesome!
Check out the documentation site here: http://existdissolve.github.io/CarTracker/
I’ll be updating this with each installment, and one of these days I’ll add a walkthrough for how to create this (even though it’s dead simple).
Anyway, super stoked about how awesome they turned out, so I thought I’d share 🙂
Share this:ExtJS 4.2 Walkthrough – Part 3: Under Control(ler)
May 21st
Yep, I lied. In the last post, I said we were going to start making data models and whatnot. All lies. We could, of course, plow ahead with making a data model. However, our app is not quite ready to support a data model of any kind, so we’d make it and have to set it aside until later. Instead of doing that, let’s just wait to make it until later and spend our time on something that will get us closer to being able to use it. Good? Excellent.
A Bit About ControllersNOTE: Code for this installment can be found on GitHub.
Controllers within ExtJS 4 MVC apps are the brains of your application, the place where the vast majority of your application’s functionality and logic will (and should be) stored. By design, ExtJS 4 is event driven, so your controllers are really like souped up event listeners.
Pretty much every component (views) and data object (stores, models) will fire off a number of events based on the context. So for example, when your store makes an AJAX request via a server proxy, the store (via the proxy) will fire a load event. In your controller (and elsewhere), you can listen to this event and More >
ExtJS 4.2 Walkthrough – Part 1: Setup
May 19th
Welcome to the first installment in our series on developing an MVC-style ExtJS 4.2 app!
As mentioned in the Introduction, the app we’ll be developing will be a simple management system for a car dealership. The name of the app is so super-creative it will blow your mind. Are you ready for this?
The name of the app is: Car Tracker
Car Tracker?
Yes, Car Tracker.
That just changed your life forever…you’re welcome 🙂
Getting StartedNOTE: Code for this session can be found on GitHub.
The first step to creating our app is, of course, to make sure that we have the framework, as well as Sencha Cmd, which we’ll use to generate, theme, and compile the app.
- Download ExtJS 4.2.0 GPL SDK
- Download Sencha Cmd (3.1.1.274)
- Make sure you have Ruby 1.9.3, not 2.0 (otherwise, Sencha Cmd won’t work right for some things)
- Go ahead and bookmark the online docs for ExtJS 4.2.0. Not only are they pretty, but super-useful.
Once you’ve downloaded the 4.2.0 SDK, extract the files. I like to put the SDK in a common location. On my Mac, I put mine here:
~me/sencha/extjs/ext-4.2.0
Ultimately, it doesn’t matter where you put it, as long as you can find it later.
Step 2: Install Sencha CmdOnce you’ve downloaded Sencha Cmd, More >
New Project: ExtJS 4.2 App Walkthrough
May 19th
Over the last few months, I’ve been building (and reading about building) a number of applications using the excellent ExtJS 4.2.0. I thought it might be fun/instructive to do something of a short “walkthrough” of the process of building an app…so that’s what I’m going to do :).
In the next series of posts, I’m going to build an MVC-style ExtJS 4.2.0 app, walking through the code and strategy at each step along the way. I hope that it will be entertaining/instructive to code along with me.
The AppThe app is not going to be complicated, but I am going to try to hit some major areas of functionality that are common to developing ExtJS 4 apps. While I can’t promise that every bit of functionality will “fit” your real app’s specific needs, I do promise to avoid ridiculous, over-simplistic and unrealistic examples. My intention is to share my experiences from building real apps, not to teach you about every possible aspect of the ExtJS 4 library, regardless of how relevant it may or may not be to what we’re building. Besides, I don’t know every possible aspect of the library anyway, so I would be of less-than-complete help in that More >
Documenting ExtJS/Sencha Touch Code with JSDuck
Jan 28th
This will be a short post, I promise 🙂
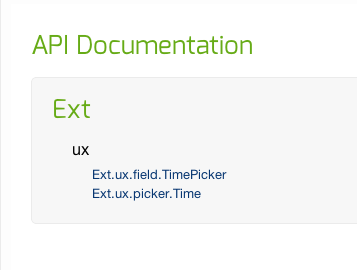
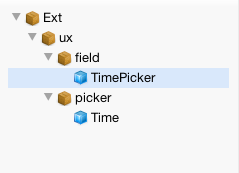
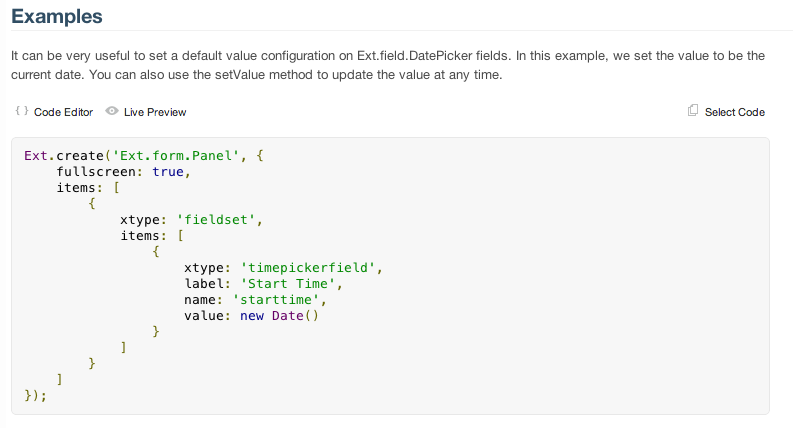
Recently, I posted my version of a time picker in Sencha Touch 2. As part of this, I wanted to *really* document the component. I decided to leverage JSDuck, the tool which is currently used by Sencha to provide API documentation for…well…everything that they do.
Beyond looking pretty flipping sweet, the awesome part about JSDuck documentation is that it’s in the vein of “self-documenting” code. That is, beyond a few configuration comments you might make here or there, nearly everything that JSDuck spits out in terms of documentation (or is that duck-umentation…ugh) comes directly from the code you write anyway. Pretty nifty.
Anyway, if you’re interested, check out the documentation for JSDuck, and enjoy the screenshots of my documented component below.
Share this:
CKEditor Plugin: Redux
Jan 21st
In my last post, I showed how it’s not only possible, but also pretty dang easy to make a custom CKEditor plugin that can interact seamlessly with a module. While it worked pretty well in modern browsers, it completely bombed on older versions of Internet Explorer (surprise, surprise).
The main *problem* with older IE support is the use of a custom html tag (<fiddle>) to store the complex data type in CKEditor. Not only does CSS styling on this unknown element fail in <IE8, but it’s insertion into CKEditor also fails completely, presumably because of the old DOM implementation.
While annoying, this is hardly a deal killer. The choice to use a “fiddle” element was hardly required…I did it because I wanted to. However, in the spirit of backward-compatibility, I’ve updated the plugin to work with a plain-old <div>.
Without further ado, here are a relevant pieces that I’ve updated:
EntryHelper.cfm (The File Where the Insertion Occurs)/*
* Common method to prepare fiddles for insertion...and insert them
* @inputs - collection of inputs
*/
function prepareFiddle( inputs ) {
...
// create double-mustache syntax
html += '
<div id="cbjsfiddle">jsFiddle - {1}'.format( vals[0], vals[1], vals[2], vals[3], vals[4], vals[5], vals[6], vals[7], vals[8] ); // insert into More >