the singularity of being and nothingness
ExtJS 4.2 Walkthrough – Part 3: Under Control(ler)
![]() Yep, I lied. In the last post, I said we were going to start making data models and whatnot. All lies. We could, of course, plow ahead with making a data model. However, our app is not quite ready to support a data model of any kind, so we’d make it and have to set it aside until later. Instead of doing that, let’s just wait to make it until later and spend our time on something that will get us closer to being able to use it. Good? Excellent.
Yep, I lied. In the last post, I said we were going to start making data models and whatnot. All lies. We could, of course, plow ahead with making a data model. However, our app is not quite ready to support a data model of any kind, so we’d make it and have to set it aside until later. Instead of doing that, let’s just wait to make it until later and spend our time on something that will get us closer to being able to use it. Good? Excellent.
NOTE: Code for this installment can be found on GitHub.
A Bit About Controllers
Controllers within ExtJS 4 MVC apps are the brains of your application, the place where the vast majority of your application’s functionality and logic will (and should be) stored. By design, ExtJS 4 is event driven, so your controllers are really like souped up event listeners.
Pretty much every component (views) and data object (stores, models) will fire off a number of events based on the context. So for example, when your store makes an AJAX request via a server proxy, the store (via the proxy) will fire a load event. In your controller (and elsewhere), you can listen to this event and hand off whatever custom processing you’d like to methods that you define within the controller. Or take a grid component. When you double-click on a row, an itemdblclick event is fired. As with the load event of the store, your controller can also listen to the itemdblclick event of the grid and do whatever you need to do in response to the announcement of that event.
Technically, you could create a “god” controller for your app, a single controller to handle every event within your app. While this is certainly possible, it is not advised. Beyond merely listening to events, controllers can also be made “aware” of particular stores, views, etc., and in turn provide very helpful auto-generated getters for the same. Therefore, it is generally suggested that you create a single controller for each main area of concern for your app.
Naming Convention Alert: When naming controllers, the suggested convention is uppercase-plural. So if you have a controller that will deal with a “car”, the best-practice for naming the controller would be “Cars”.
Our First Controller
When our app was generated, Sencha Cmd created a simple controller named Main in the controller folder. Stupid name. Let’s rename it to Base.
Why Base? As you develop your application, you’ll probably come across a lot of areas where you repeat the same code over and over within your controllers. If we create a base controller from which all other controllers inherit, we can add any common methods that are applicable to all our controllers. And even if we don’t use it right away, starting with a Base controller will save us refactoring time in the future when we do need it.
Here’s what our Base.js controller looks like:
Ext.define('CarTracker.controller.Base', {
    extend: 'Ext.app.Controller'
});
Pretty dang exciting, right?
While we’re still in the controller folder, let’s create one more controller. Call this one App.js. The App controller is where we’ll put the stuff that controls a lot of the high-level stuff relating to our application…stuff like global menus, user login, etc:
Ext.define('CarTracker.controller.App', {
    extend: 'CarTracker.controller.Base',
    init: function() {
        this.listen({
            controller: {},
            component: {},
            global: {},
            store: {}
        });
    }
    // custom methods here...
});
As you can see, instead of extending the default Ext.app.Controller, we extend the Base controller that we created earlier. Next., we define our init() method. The init() method runs when the application boots up. If we needed to any special setup in our controller on application startup, we could do that here.
However, right now, all we’re doing within init() is setting up event listeners across the new domains that were introduced with ExtJS 4.2.
- controller: Event domain of all controllers that extend Ext.app.Controller (which App does via its extending Base).
- component: Event domain for components (most used). We can use component-query selectors to tap into this
- global: Event domain for anonymous, global events.
- store: Event domain for store events (very awesome and handy)
We’ll get into how to use these later on, but just know that the combination of all these event domains gives us CRAZY flexibility and power over building our app and precisely responding to what occurs within any aspect of it.
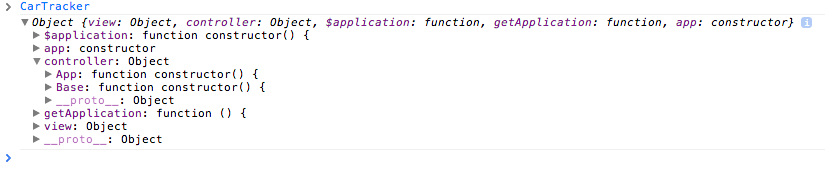
Before we set our controllers aside for a few moments, let’s be sure to register them with our application. To do this, open app.js from the root of our ExtJS 4 site. In the controllers[] array, replace the now-defunct Main with App. If you refresh your app in the browser, you should notice no change. However, if we view our application in the console, we should see that our two controllers are registered with the application…in other words, our app knows about them and we can start using them. Sweet!
A Simple Menu
In order to really use our controller, we need to have something to listen to. While we could wire up some events from components that we’re already using (e.g., the Viewport or one of the regions), let’s not waste time with pointless examples. Instead, let’s build out a simple menu which we can then wire up within our controller.
In view/layout, create a new file called Menu.js:
Ext.define('CarTracker.view.layout.Menu', {
    extend: 'Ext.menu.Menu',
    alias: 'widget.layout.menu',
    floating: false,
    initComponent: function(){
        var me = this;
        Ext.applyIf(me,{
            items: [
                {
                    text: 'Options',
                    itemId: 'options',
                    iconCls: 'icon_gear'
                },
                {
                    xtype: 'menuseparator'
                },
                {
                    text: 'Sales Staff',
                    itemId: 'staff',
                    iconCls: 'icon_user'
                },
                {
                    xtype: 'menuseparator'
                },
                {
                    text: 'Inventory',
                    itemId: 'inventory',
                    iconCls: 'icon_tag'
                }
            ]
        });
        me.callParent( arguments );
    }
});
Be sure to notice the itemId properties on the configs above. These will allow us to easily differentiate and identify these items as we need them in our controller.
Now let’s add our menu to our app. In view/layout/West.js, do the following:
Ext.define('CarTracker.view.layout.West', {
    extend: 'Ext.panel.Panel',
    alias: 'widget.layout.west',
    requires: [
        'CarTracker.view.layout.Menu'
    ],
    region: 'west',
    title: 'Menu',
    split: true,
    bodyPadding: 5,
    minWidth: 175,
    width: 175,
    initComponent: function(){
        var me = this;
        Ext.applyIf(me,{
            items: [
                {
                    xtype: 'layout.menu'
                }
            ]
        });
        me.callParent( arguments );
    }
});
You’ll probably notice a few tweaks from before. However, the important bits are bolded. First, we added our Menu view to the requires[] config of our West view. As we saw before, this instructs the dynamic loader to ensure that the Menu class is loaded before the West class. Why is this important? Because a few lines later, we add the Menu as a child of the West panel. Without the requires, West would not know about Menu, and would throw an error.
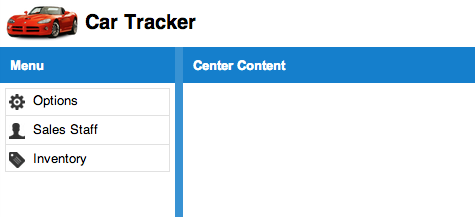
Alright, nice work. Go ahead an reload. If everything’s wired up correctly, we should now see something like so:
Wiring Up The Menu
While our fancy new menu looks nice, it still doesn’t do anything. It would be nice if clicking the menu items would, you know, load some content or something. I agree!
One of the things I like to do with this style of navigation is to hook it into Ext.util.History. Ext.util.History is awesome because it provides a very simple way to incorporate “state” into your application. With one-page applications, this is pretty important, as you no longer have the concept of a distinct “page” where this functionality lives vs. some other functionality; rather, then single page is your entire app, and visa-versa.
With Ext.util.History, however, we can define various “tokens” that represent a particular state of our application. By utilizing the “hashbang” (#) url model, we can provide hooks into particular states of our application that are not only accessible via a URL, but can also leverage the back/forward buttons of the browser chrome to navigate between sections of our application.
To implement this, let’s start in app.js:
Ext.application({
    ...
    requires: [
        'Ext.util.History'
    ],
    ...
    /**
     * launch is called immediately upon availability of our app
     */
    launch: function( args ) {
        // "this" = Ext.app.Application
        var me = this;
        // init Ext.util.History on app launch; if there is a hash in the url,
        // our controller will load the appropriate content
        Ext.util.History.init(function(){
            var hash = document.location.hash;
            me.getAppController().fireEvent( 'tokenchange', hash.replace( '#', '' ) );
        })
        // add change handler for Ext.util.History; when a change in the token
        // occurs, this will fire our controller's event to load the appropriate content
        Ext.util.History.on( 'change', function( token ){
            me.getAppController().fireEvent( 'tokenchange', token );
        });
    }
})
First things first. In requires[], we’ve added Ext.util.History to ensure that the class is available. Next, we’ve added a method named lauch(). Launch() is a special method in Ext.application, as it automatically executes when the page has completely loaded, making it an ideal place to do app-setup related tasks.
The very first thing we do is to call the init() method of Ext.util.History, a call which *must* occur in order to use Ext.util.History. Within this method, we retrieve the “hash” from the URL, and then fire an event on the App controller (which we previously created) called tokenchange, passing along the value of the URL’s hash.
NOTE: By convention, every controller registered with Ext.app.Application will have a getter automatically generated (e.g., getAppController()). We could also do me.getController( ‘App’ ) to achieve the same result).
Next, we set up an listener on Ext.util.History’s change event, and also fire the App controller’s tokenchange event. The change event will fire when the back/forward actions in the browser occur. And since Ext.util.History is keeping track of these for us, we can easily handle the token change between these events, and server up the state of our app however we need to.
Some Controller Action
Now that we have Ext.util.History setup and ready to go, let’s return to our fancy App controller and implement some logic to handle the tokenchange event. The changes come in a few stages, so let’s take them one at a time.
Refs
Ext.define('CarTracker.controller.App', {
    ...
    views: [
        'layout.Menu',
        'layout.Center',
        'layout.Landing'
    ],
    refs: [
        {
            ref: 'Menu',
            selector: '[xtype=layout.menu]'
        },
        {
            ref: 'CenterRegion',
            selector: '[xtype=layout.center]'
        }
    ]
    ...
});
In our controllers, we can add some cool configs called refs that provide references to views that we want our controller to easily interact with. For each ref that we create, the controller will automatically create getter methods to make interacting with the view that much easier.
The basic config of a ref is:
- ref: The reference that you want to create
- selector: The selector used to “find” the view. In our example, we’re keying on the xtype of the component
In our controller, we have two refs: Menu and CenterRegion. Now, when we want to get an instance of either view, we can simply use the generated getters: getMenu(), getCenterRegion().
Our Controller Events
Ext.define('CarTracker.controller.App', {
    ...
    init: function() {
        this.listen({
            controller: {
                '#App': {
                    tokenchange: this.dispatch
                }
            },
            component: {
                'menu[xtype=layout.menu] menuitem': {
                    click: this.addHistory
                }
            },
            global: {},
            store: {}
        });
    }
    ...
});
We saw earlier that within the init() method of our controller we can create listeners to events that occur across the various event domains of our application.
In this case, we have two listeners established, one for a controller event, and one for a component event.
For our controller event, we simply specify the ID of the controller (by default, it’s the name of the controller) whose events we want to listen to. Next, we specify the event we’re interested in listening to. In this case, we’re interested in the tokenchange event, which we manually fired from our Ext.util.History init() and change() methods.
For our component event, we have a Ext.ComponentQuery set up to listen to events (specifically “click” events) from menuitems belonging to a menu with an xtype of layout.menu. When a click occurs, we dictate that a custom method called addHistory() should be executed.
Hint: With component queries, it’s often easiest to start from the right, and work your way left. In this example, our ComponentQuery specifies that we want to select all menuitem elements that are decendents of a Ext.menu.Menu component that has an xtype of layout.menu.
The Magic
Alright, we’ve laid the ground work with Ext.util.History. Now it’s time to bring it all together. Since we have specified two custom methods (dispatch() and addHistory()) that should be executed when our controller and component listeners fire, we should probably add these methods to our controller 
Ext.define('CarTracker.controller.App', {
    ...
    /**
     * Add history token to Ext.util.History
     * @param {Ext.menu.Item} item
     * @param {Object} e
     * @params {Object} opts
     */
    addHistory: function( item, e, opts ) {
        var me = this,
            token = item.itemId;
        Ext.util.History.add( token );
        me.fireEvent( 'tokenchange', token )
    },
    /**
     * Handles token change and directs creation of content in center region
     * @param {String} token
     */
    dispatch: function( token ) {
        var me = this,
            config;
        // switch on token to determine which content to create
        switch( token ) {
            case 'staff':
                config = {
                    xtype: 'panel',
                    title: 'Staff',
                    html: 'Some staff content'
                };
                break;
            case 'options':
                config = {
                    xtype: 'panel',
                    title: 'Options',
                    html: 'Some options content'
                };
                break;
            case 'inventory':
                config = {
                    xtype: 'panel',
                    title: 'Inventory',
                    html: 'Some inventory content'
                };
                break;
            default:
                config = {
                    xtype: 'layout.landing'
                };
                break;
        }
        me.updateCenterRegion( config );
    },
    /**
     * Updates center region of app with passed configuration
     * @param {Object} config
     */
    updateCenterRegion: function( config ) {
        var me = this,
            center = me.getCenterRegion();

        // remove all existing content
        center.removeAll( true );
        // add new content
        center.add( config );
    }
    ...
});
Our custom addHistory() method is really just a utility for interacting with Ext.util.History, so we’ll skip it and move on to dispath().
dispatch() is going to become like the telephone operator that routes calls to the correct number; in other words, it will be the method that instructs our app which main views to load. It is ultimately the means that we will use for maintaining state.
Very simply, our dispatch() method does nothing other than switch() on the incoming token. For each expected token, we simply specify a component configuration that we would like to use for creating content within the main content region of our site (e.g., the “center” region). Once we’ve built up the config, we pass along the configuration to our updateCenterRegion() method. In this method, we first destroy any existing content in the center region, and then run add(), passing along the config which we built up via the incoming token and our custom logic in dispatch().
Notice that we have a layout.landing xtype. This is a custom view class that I’ve set to load if no incoming token matches an expected state. Feel free to add that when you have a chance.
If we reload our application in the browser, we should see this all come together. First, try clicking on one of the menu items. In the URL, you should see the URL change as a hashbang token is added (e.g., “#staff”). You should also see the center content region get updated with the fake panel we temporarily specified in the dispatch() method for the particular token.
Now, if you click on another menu item, you should see the URL change again, and the center content region should be updated with the new, fake content.
Next, try clicking the “Back” button in the browser. If everything is configured properly, you should see the URL revert to the previous state, and the content in the center region should update to the prior state.
Pretty cool, huh? Take some time, play around with this, and get comfortable with what’s happening.
Conclusion
In this installment, we did a TON. Not only did we make a legit controller, but we actually wired up some views to this controller. Heck, we even integrated Ext.util.History to help make our navigation work, as well as to inject some much desirable state management into the mix.
With this foundation laid, we can really start building up our app, and can finally shift our focus to wiring up our application to stores, models and proxies which will let us move into the realm of interaction with our server and database. Oh yes, it will be awesome.
| Print article | This entry was posted by existdissolve on May 21, 2013 at 10:53 pm, and is filed under ExtJS, ExtJS 4.2. App Walkthrough. Follow any responses to this post through RSS 2.0. You can leave a response or trackback from your own site. |
about 11 years ago
Ext.define(‘CarTracker.controller.Main’, {
extend: ‘Ext.app.Controller’
})
Should be:
Ext.define(‘CarTracker.controller.Base’, {
extend: ‘Ext.app.Controller’
})
about 11 years ago
Thanks for the heads up! I’ve fixed it in the post.
about 11 years ago
Hello,
I’m going through this series to help me get up to speed on Ext.js. Thanks for putting it together. I have one question. In your code for the Menu.js view file, you declare the menuItems by passing them into an Ext.applyIf() mehod call within the initComponent handler. Why not just declare the menu items directly in the Items array of the view? I tried it and it seems to work fine. So I was wondering if there was any particular reason you preferred to do it on initComponent. Thanks
about 11 years ago
Hi Tony–
Glad the series is helpful!
Re: your question, I typically put “complex” configurations inside initComponent(), simply because it makes it easier to do custom logic configuration. For example, if I wanted to construct a menu with only particular items based on the user’s role (or even another config on the class itself), I could do that pretty easily, whereas it would not be possible (or not terribly practical) by just defining them statically in the items configuration. Of course, I’m not doing that in this example, but that’s part of the rationale for why I did it that way…a bit of future proofing.
Plus, if I needed to interact with something up the chain of inheritance, I could do that in initComponent() as well.
Hope that helps–thanks!
about 11 years ago
Yep, that makes a lot of sense. Thanks again!
about 11 years ago
I really like the way you implemented ‘Ext.util.History’. I was struggling with this in my own application. I am using it now to load ‘modules’ (controllers with views, etc. to be exactly). Thumbs up!
about 11 years ago
Thanks, glad it was helpful to you!
about 11 years ago
Hi there,
After playing around with your example code I have some questions about your approach using ‘Ext.util.History’. It’s not to be picky
First I want to know why you are using a event to fire (tokenchange) and in the App-controller listen to it? Why not call dispatch directly?
Why are you firing this event (tokenchange) in ‘addHistory’? In this way you are calling Dispatch(token) twice. By adding a token to the history you are calling the change event of the history singleton, which will fire ‘tokenchange’ as declared in Application.js.
Why are you using ‘document.location.hash’ in the init of History? You can use this.currentToken, where this is Ext.util.History.
My code:
Application.js
launch: function (args) {
console.log(‘launch’);
// “this” = Ext.app.Application
var me = this;
// init Ext.util.History on app launch; if there is a hash in the url,
// our controller will load the appropriate content
Ext.util.History.init(function () {
//me.getAppController().fireEvent(‘tokenchange’, this.currentToken);
me.getAppController().dispatch(this.currentToken);
});
// add change handler for Ext.util.History; when a change in the token
// occurs, this will fire our controller’s event to load the appropriate content
Ext.util.History.on(‘change’, function (token) {
//me.getAppController().fireEvent(‘tokenchange’, token);
me.getAppController().dispatch(token);
});
}
app.js
addHistory: function(item, e, opts) {
var me = this,
token = item.itemId;
Ext.util.History.add(token);
//me.fireEvent(‘tokenchange’, token);
}
about 11 years ago
Hi Peter–
Thanks for the feedback!
Re: event vs. calling the method directly, I don’t recall why I chose that approach. I believe in earlier iterations of the app I ported this example from, I had used the event for some additional processing, and just carried over the firing of the event. Certainly nothing wrong with calling the dispatch() method directly. But one nice thing about firing the event is that you could have other controllers interact with the event as well, in which case I think I’d still stick with the event firing.
You’re certainly right on the double-firing in addHistory(). If you look at later chapters of this walkthrough, you’ll see that I correct that in the code as well.
Re: the document.location.hash, thanks for the heads up. Years ago when I originally wrote the History code that I ported to this, I didn’t realize that currentToken was in Ext.util.History, so I’ll certainly update to include your suggestion.
Thanks again for the feedback!
about 11 years ago
Thank for your reply. Sometimes it’s a good someone new is looking in into your code. Specially when that someone is brand new to extjs mvc and all options are open
I agree with using the events and reusability. I think I am moving dispatch to a singleton ‘handler/helper’ which I can call from anywhere. Or a mixin, but probably not. All roads lead to Rome..
Thanks again
about 11 years ago
Re: the singleton, I would definitely suggest you do that. In the newest project I’m working on, I’ve ditched the approach I used in this walkthrough and have developed a singleton Router class that encapsulates the history and dispatch functionality, as well as full route pattern-matching support. This allows me to define the routes (simple and complex, even with variable support) directly in the individual controllers themselves, letting me to move away from the App.js god-controller. I’ve even put in place a custom EventDomain for this Router class that lets controllers get involved in the routing event life-cycle (if they need to).
Of course, the approach in this walkthrough is perfectly fine for small projects, so like you said, all roads…:)
about 11 years ago
Hello,
I have a question about your use of Ext.util.History. I’ve read that this class must be used in conjunction with a hidden form field and an iframe. For example:
http://stackoverflow.com/questions/17101923/extjs-url-navigation
However I noticed your example didn’t do this. Was this something required in earlier versions? The Ext docs themselves don’t seem to mention this but I’ve seen read this in other places besides the url above.
about 11 years ago
Hi there,
From the source, older browsers rely on the iframe i quess:
http://docs.sencha.com/extjs/4.0.7/source/History.html
about 11 years ago
Thanks Peter. Yes, after I did some further reading it seems like this is done for older browsers. Thanks for confirming.
about 11 years ago
Actually, this example from dev.sencha.com uses the iframe and form field (view source on this page):
http://dev.sencha.com/deploy/ext-4.0.0/examples/history/history.html#main-tabs:tab1:subtab1
about 11 years ago
I am trying Ext.create(‘CarTracker.controller.App’) on chrome console, and it gives the error “Cannot call method ‘getView’ of undefined”
Also, as I am using ExtJs 4.1.1, does this have a impact on the above error ? How do I register the Application events in my ‘god’ controller in ExJs 4.1.1. Any help is highly appreciated.
about 11 years ago
Hi Saurav–
It’s quite possible that certain things aren’t working because of the differences between Ext JS 4.1+ and 4.2+. Can you upgrade?
about 11 years ago
Well your tutorial is really good, It’s rare to find examples on the web of well structured and best practices oriented example projects. However, I’ve found a flaw and I’ve got a doubt:
Flaw – After you create the menu, there is no indication as to how to properly “hook” it to the actual application
Doubt – I’ve read on the Sencha Docs for the new Ext JS that controllers don’t necessarily have to be declared on the app.js. Is this really so? Your example doesn’t seem to comply. What would you say is the best approach?
Excellent work, keep that up.
about 11 years ago
Looked at your example’s source code at GitHub, this was missing on your tutorial:
Ext.define(‘CarTracker.view.Viewport’, {
extend: ‘Ext.container.Viewport’,
requires:[
‘Ext.layout.container.Border’,
‘CarTracker.view.layout.North’,
‘CarTracker.view.layout.West’,
‘CarTracker.view.layout.Center’
],
layout: {
type: ‘border’
},
items: [
{ xtype: ‘layout.north’ },
{ xtype: ‘layout.west’ },
{ xtype: ‘layout.center’ }
]
});
I realize that part II isn’t to be found. Of course, it’s quite obvious that the views and regions would have to be hooked in some way, I was curious if there was a different approach with the new version. You see, I used to to this at the controller level, with support from an abstract controller class that would hook everything up for me at the fundamental level. Then, on each controller, I’d just declare what views where to be loaded, and the controller would assign the views to regions.
Anyway, I’d like to read your thoughts on this.
My best regards.