the singularity of being and nothingness
ExtJS 4 Theming: Getting This Thing to Go
Recently, I’ve been concentrating a lot on theming for Sencha Touch. If you’ve read much of what I’ve posted, you know that I really love how the framework is put together, and think the SASS-y mode of custom theming is just awesome.
Of course, ExtJS 4 has many of the same theming features, and a very similar workflow for creating and compiling custom themes. I’ve been playing around within some theming experiments, and learned some frustrating lessons along the way. So I thought I’d share, step-by-step, how I set up my environment for successfully compiling custom stylesheets for ExtJS 4…just in case you’re having issues 🙂
Getting Started
First off, I’m assuming you already have Ruby and the Compass/SASS gem installed. If you don’t take a few minutes to get that done. For instructions on how to do this, check out this walkthrough.
Before breezing on, take a few deep breaths. This is a critical step…if you don’t do it right, you have hours of frustration ahead of you.
I start off with a blank project (I’m using Eclipse, so insert whatever terminology you use for your IDE). First, I create the root folder for my project. I’m calling this one “playground.”
With my root folder created, the next step is to create a folder in our project to hold our ExtJS assets. I’m creating one that’s creatively named “extjs“. It doesn’t really matter what you name it…just make sure it’s something you can quickly and repetitively type (more on this later).
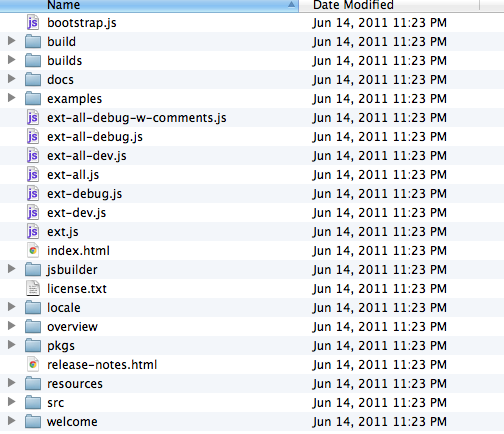
Now, we need to add the ExtJS 4 library to our project. If you just downloaded it, you should see something like following in the downloaded folder:
From this folder, copy, at a minimum, the following:
- ext-all-debug.js
- ext-all.js
- resources (the whole folder…the whole folder…the whole folder…do not fail to copy the whole folder!!)
Ok, you copied these, right? Double-check, and when you’re sure you have EVERYTHING you need, paste them into the “extjs” folder within your project.
Create a Custom Sassy Style Sheet
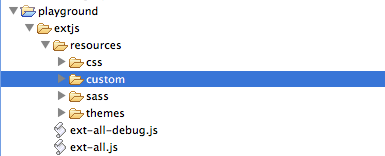
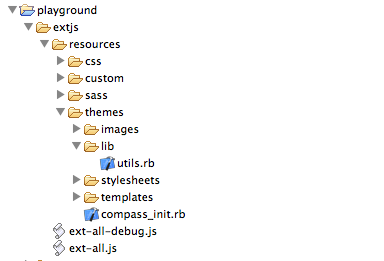
Excellent. If you followed along with the steps above, you’ve got a solid structure, not only for theming, but for creating your ExtJS 4 app in general. Here’s what my setup looks like:
Now for the fun stuff. While it’s certainly possible to create a full-on custom “theme” for your ExtJS 4 app, the best introduction to theming is creating a custom stylesheet that’s based on the default style structure that comes baked into ExtJS 4 by default. In this walkthrough, we’re actually not going to customize anything at all. Rather, we’re simply going to create our own “ext-all.css” file, just with a different name. The idea is that once we’ve got the process down, we can start customizing without the frustration of set up getting in our way.
So the first thing I like to do is to create a custom folder to store my .scss (sassy cascading style sheet) files. I do this at the following location:
- playground/extjs/resources/custom/
The next step I take is to copy the helpful .scss template that ExtJS 4 provides. You can find this at the following location:
- playground/extjs/resources/themes/templates/resources/sass
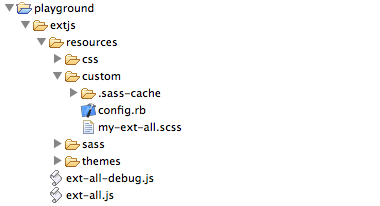
Take the “config.rb” and “my-ext-theme.scss” files, copy them, and paste them into the custom folder we just created. Rename the .scss file to something more relevant…I’m going to use “my-ext-all.scss“.
If you open up my-ext-all.scss, you’ll note that there are a few variables being set, and a lot of guidance notes. I’d encourage you to take a few moments to read through them to being gaining some understanding about what’s going on.
Let’s Compile
At this point, we’ve technically created a custom stylesheet for ExtJS 4. All that’s left is to compile. Check out Compass’ website if you have no idea what this means. If you don’t care what it means and just want to compile something, keep reading 🙂
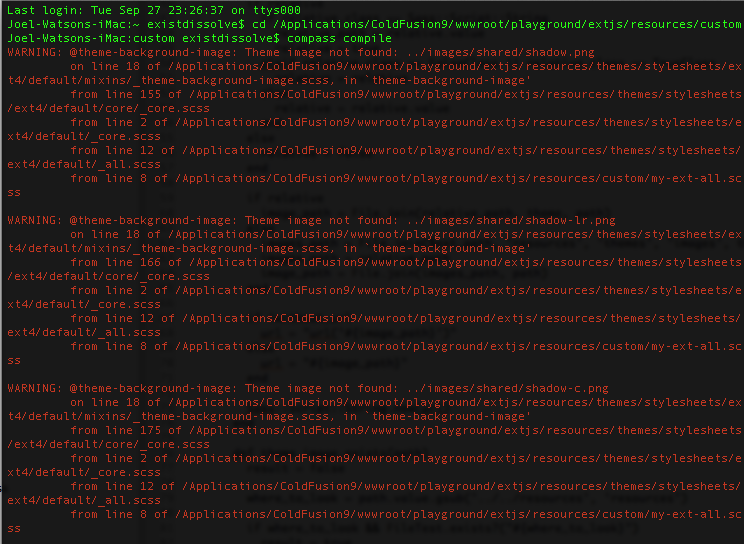
To compile, first open up Terminal. Navigate to the “custom” folder that we created a few steps ago. Here’s what it looked like for me:
Once you’ve successfully navigated to this folder, simply type “compass compile.”
CRAP! CRAP! CRAP! On your first compile, you’re probably going to see a lot of RED. You might see a bunch of warning messages to the effect that “Theme image not found…”
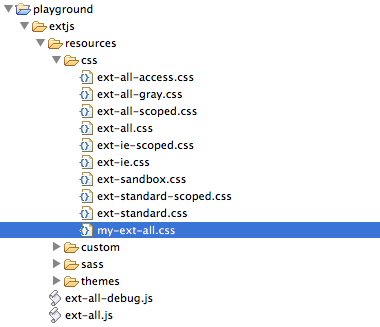
On the bright side, this process still created a stylesheet, in spite of the errors. If you look in playground/extjs/resources/css, you should see a new .css file with the same naming convention as our .scss file: “my-ext-all.css“. On the not-so-bright-side, if we actually try to use this, it will be broken. Most things will look pretty okay, but important images (tool icons, etc.) will be nowhere to be found. Not great.
Fortunately, this is *relatively* easy to fix.
In your project, navigate to the following file and open it:
- playground/extjs/resources/themes/lib/utils.rb
Two small changes here:
- Line 44(ish): Change relative_path = “../images/” to relative_path = “../themes/images/default” ***
- Line 62(ish): Replace images_path = File.join($ext_path,’resources’,’themes’,’images’,theme) with images_path = relative_path
With these changes made, go delete the “my-ext-all.css” file (NOT THE .SCSS FILE!). Now, recompile. You *shouldn’t* see any more RED, but simply see a confirmation that the compilation was successful and that your new CSS file was created.
*** Some walkthroughs will tell you to make a copy of your “themes/images/default” folder and place it in the root of “resources.” If you use this approach, you won’t need to make a copy.
Now, if we take a peek in our css folder (playground/extjs/resources/css), we should notice a new my-ext-all.css file. And if we hook it up to one of our pages, it should display the correct style AND successfully deliver the correct image paths for loading.
Wrapping Up
At first glance, it might appear that we didn’t really accomplish a whole lot. Honestly, in terms of “producing” things, we didn’t…we merely duplicated what was already a perfectly good stylesheet.
But from a more important perspective, we actually accomplished a lot. Now that we have things wired up correctly, we can really begin digging into customizing our custom style sheet. While we could have certainly jumped right into that from the beginning, believe me, it’s better to get things wired up first. There’s nothing more frustrating that staring at error messages for hours on end because you didn’t take the time to get things set up properly from the start.
So what about customization? In my next post, I’ll show just how easy it is to begin customizing our stylesheet now that we’ve got our compilation process worked out.
| Print article | This entry was posted by existdissolve on September 28, 2011 at 12:17 pm, and is filed under ExtJS. Follow any responses to this post through RSS 2.0. You can leave a response or trackback from your own site. |





about 12 years ago
Please write tutorial on doing some basic theme customizations; this article here is a good starting point though.
about 12 years ago
Ivan–
I actually started doing that last night, but then realized that with the wrinkles in the process of getting setup to compile, it might make more sense to back up and start at the beginning. So that’s what I did 🙂
Look for an article on custom ProgressBar UIs tonight…
about 12 years ago
The reason you are seeing all the red warning messages is because you are running the ‘compass compile’ command in the custom folder.
If you back up to the ‘playground’ folder and run:
compass compile resources/custom
the warnings will disappear. The sencha scss files make this assumption about how compass will be used.